Trion ICP/RIE

Trion RIE/ICP | Contact Information |
| Trion Technology Minilock Phantom III RIE/ICP | Faculty Contact: Aaron Hawkins |
| Maintenance Request | Staff Contact: Jim Fraser |
| SCHEDULER IS REQUIRED | Student Contact: James Harkness |

The Trion Minilock Phantom III RIE/ICP is used for anisotropic dry etching of silicon oxide, silicon nitride, polysilicon, aluminum, and gallium arsenide. In addition to a Reactive Ion Etching (RIE) RF generator, the Trion uses an Inductively Coupled Plasma (ICP) RF generator to produce a high-density plasma, which allows for lower process pressures, higher etch rates, and higher anisotropy than RIE alone. Trion's electrostatic chuck with helium backflow also increases sample cooling during the etching process. The process gases used with the Trion are O2, CF4, CHF3, SF6, BCl3, and Cl2. The system is equipped with a load lock and can process one 4 inch wafer at a time. Smaller, flat samples can be etched if they are mounted in the center of a 4 inch carrier wafer. When a process is running, you should be able to see the plasma through the sight glass.


System Overview
Trion RIE/ICP Labeled Diagram Button Definitions
- OFF Button: This will turn off power to the computer, RF generators and turbo controller. If the system is OFF, press the "MAIN" button to restart.
- MAIN: This will turn off the power to the computer (and close all gas and vacuum valves), the RF generators and the turbo pump. You must press the "EMO" button to shut off the pump.
- PUMP: This will turn on the chamber roughing pump.


Start Up Procedure
- The process gases are located in the back pump room. Make sure the necessary gases are turned on by opening the valves on top of the cylinders. Make sure you turn on the helium as well (for wafer cooling).
- On the touch screen, press "Log On" and enter a username and password using the pull-out keyboard (username: trion | password: trion). On the touch screen, press "Load/Edit Recipe".
- On the next screen, you will see all of the process parameters. You can edit any parameter by touching it.
- Press "Recipe From Disk" to load a saved recipe or "Create New Recipe" if you want to start with a blank recipe.
- Choose your recipe from those listed. (Press "next screen" if your recipe is not listed)
- After choosing the recipe, press the "Exit" button. Now, your recipe will be displayed, and you can edit any parameters you like. Press the "Exit" button when finished. Press "Download Recipe" to download to the controller.


Loading A Wafer Press
- "Load Wafer" on the main screen. In the pop up window, press "Vent Lock First". Once the system is vented, the load lock lid will open automatically.
- Put the wafer on the loading arm very carefully. Don't put excess pressure on the loading arm.
- Make sure you align the flat of the wafer with the flat of the loading arm. If you do not, your wafer might break inside the chamber!
Automatic etching process (Use when you have a proven recipe)
- Tune your recipe with a dummy wafer in the chamber.
a. There should already be a dummy wafer in the chamber. If there is not, use the unload and load functions to load the wafer.
b. Load a saved recipe or start a new recipe and change the parameters as needed.
c. On the main screen, press "Manual Process Control".
d. Press "Press Iso Closed" and it should turn green. This opens the isolation valve between the Baratron pressure gauge and the chamber.
e. Then press "Gases Off" to turn on the gases and wait for the pressure to stabilize at the process pressure.
f. When everything is ready, press "RF Off" to start the RF. Once the RF turns on, the "Process Time Read" counter will start to COUNT UP (Not count down). This timer is only for your information, since the process will not stop automatically. Looking through the sight glass into the chamber, you should see a stable plasma with no flickering.
g. Monitor the reflected RF power for both power supplies. If the automatic tuning does not reduce the reflected power for either supply to below 5% of the set point, use the Tuning Procedure shown below to manually tune the RF.
h. If your recipe has multiple steps, ensure that RF is tuned for all steps of the process.
i. Once your recipe is tuned, press "RF On" and "Gases On" to turn off the RF and the gases (the buttons should turn gray). Press "Exit" to return to the main screen.
2. Press "Unload Wafer" to begin the unload process. Once the load lock lid opens, replace the dummy wafer with your process wafer. Be sure that the flat of your wafer aligns with the corresponding flat on the wafer arm.
3. Press "OK" to pump down the load lock. Wait about 30 seconds before proceeding. This gives the load lock a chance to pump down before attempting to load the wafer.
4. Press “Load Wafer” to begin loading your wafer into the chamber. Press “Do Not Vent” if your wafer is already in the load lock. Your wafer should automatically load into the chamber.
5. Once your wafer is loaded, ensure that your recipe is set to the correct etching time. Then, press the “Automatic Single Process” button. Once the button is pressed, the whole process will run, and nothing can be changed until it finishes except for the RF tuning. When your process is finished, the main screen will be displayed.
6. Unload your wafer using the “Unload Wafer” button. When the lid opens, replace your wafer with the dummy wafer and load it in the same manner as you did your process wafer. Again, wait about 30 seconds before pressing the “Load Wafer” button.
7. Run the clean recipe for the same amount of time that you ran your etch recipe, including tuning time. The clean should be run with a dummy wafer in the chamber.
8. After the clean is finished, you can leave the dummy wafer in the chamber. Turn off the gases in the back pump room. Don't forget to fill out the user log.
Manual etching process
- Tune your recipe with a dummy wafer in the chamber. See Automatic etching process above for details.
2. Press "Unload Wafer" to unload the dummy wafer. Once the load lock lid opens, replace the dummy wafer with your process wafer. Be sure that the flat of your wafer aligns with the corresponding flat on the wafer arm.
3. Press "OK" to pump down the load lock. Wait about 30 seconds before proceeding. This gives the load lock a chance to pump down before attempting to load the wafer.
4. Press “Load Wafer” to begin loading your wafer into the chamber. Press “Do Not Vent” if your wafer is already in the load lock. Your wafer should automatically load into the chamber.
5. Run the manual process.
a. On the main screen, press "Manual Process Control".
b. Press "Press Iso Closed" and it should turn green. This opens the isolation valve between the Baratron pressure gauge and the chamber.
c. Then press "Gases Off" to turn on the gases and wait for the pressure to stabilize at the process pressure.
d. When everything is ready, press "RF Off" to start the RF. Once the RF turns on, the "Process Time Read" counter will start to COUNT UP (Not count down). This timer is only for your information, since the process will not stop automatically. Looking through the sight glass into the chamber, you should see a stable plasma with no flickering.
e. Monitor the reflected RF power for both power supplies. If the automatic tuning does not reduce the reflected power for either supply to below 5% of the set point, use the Tuning Procedure shown below to manually tune the RF.
f. Once you have etched for the desired time, press "RF On" and "Gases On" to turn off the RF and the gases (the buttons should turn gray).
g. Press "Exit" to return to the main screen.
6. Unload your wafer using the “Unload Wafer” button. When the lid opens, replace your wafer with the dummy wafer and load it in the same manner as you did your process wafer. Again, wait about 30 seconds before pressing the “Load Wafer” button.
7. Run the clean recipe for the same amount of time that you ran your etch recipe, including tuning time. The clean should be run with a dummy wafer in the chamber.
8. After the clean is finished, you can leave the dummy wafer in the chamber. Turn off the gases in the back pump room. Don't forget to fill out the user log.


Tuning procedure
- Locate the panel below the monitor, it has one red button, two black buttons and some switches.
- There are two sets of switches - the top set is for the ICP matching network, the bottom is for the RIE matching network.
- Flip the "AUTO/MANUAL" switches to the fully down position for manual tuning. The selection switches have 3 positions: up = automatic, middle = nothing, down = manual.
- (For an existing Recipe RIE tuning only) First adjust "C1" while watching the voltmeter until you reach the impedance specified for your recipe. The Tune points should be easily found in the tool bar at the bottom of the screen. If it is not there, search for the word pad file "Tune Points Revised".
- Once C1 is adjusted to the given impedance then enter Manual Process Control and follow the above Manual Etching Process steps until the RF is on. Note: This should be done with the Trion dummy wafer loaded in the chamber.
- With the RF on now adjust C2 until the RIE reflected is 1 or 0 and stable.
- Turn off RF, gases and then Exit.
TUNING A NEW RECIPE THAT DOES NOT HAVE AN ALREADY KNOWN TUNE POINT
These steps can be used for both ICP Tuning and RIE Tuning. This is applicable when the automatic tuning does not minimize the reflected power for a recipe. If automatic tuning is not working in general, the phase-mag that is used in the automatic tuning feature may need to be adjusted. Details for this can be found in the Trion user manual.
1. Follow the Tuning procedure steps 1 through 3.
2. While watching the measured reflected power on the process screen, adjust both the "C1" and "C2" switches iteratively for each power supply to minimize the reflected power. These switches are momentary, so when you release them, they will return to the neutral position. If you cannot get the reflected power below 15 W or 5% of the forward power within 60 seconds, shut off the RF power!
3. After minimizing the reflected power, leave the "AUTO/MANUAL"switch in the manual (down) position. Switching it back to the automatic position may increase the reflected power.
CLEANING PROCEDURE
1. The chamber should be cleaned after every etch.
2. Load a bare silicon wafer into the chamber. This must be done to avoid damage to the wafer lift pins in the chamber.
3. Load the "CLEAN-new" recipe from the disk and run the program in manual mode. You will have to tune the RIE manually.
4. Leave the Trion's bare silicon wafer loaded when you are finished.

TROUBLESHOOTING
1. When running a multi-step process, do not use more than 13 steps. If you do, the first step will not work properly.
2. Make sure you align the flat of the wafer with the flat of the loading arm, or your wafer will break during the load/unload procedure.
3. If your wafers are coming out of the Trion with what we call a "sneeze effect" (nasty spotting all over the wafer such that it looks like someone sneezed on it), there could be a number of reasons.
First: Check your own fabrication steps for your devices. What materials are you using for a mask? What materials have you used on your wafer that could have left a residue? Are you descuming for sufficient amount of time? When using SU8 it is especially important that you descum for sufficient time before etching your wafer in the Trion.
Second: Check the Helium tank. If the He is turned off then you are not cooling the wafer properly and that could result in uneven etching. Also check the He pressure and flow rate, while you etch
Third: Check the clamp inside the chamber. If it looks like the picture below, you need to reanodize the clamp or send the backup clamp located under the load lock in a bag.
4. Trion does not maintain the set pressure during etch. There could be a number of reasons. First make sure the Turbo pump is running. Then abort out of auto run and do a manual run up to turning the gas on and off. Check to see if it gets to pressure. If it still doesn't work, leak check the system, make sure the pumps are working properly and good luck. Sometimes if your recipe has high gas flow and low pressure, being off a little is normal.
5. Found a leak under the chamber? If you find that there is a leak underneath the chamber before doing anything check if the leak gets worse as you raise and lower the pins. If it does the problem lies within the bellows. If not here is a schematic of other possibilities. Do not take apart by yourself this is a two maybe three man job. There are a number of likely suspects for leaks in this assembly: O-ring seals On the small Swagelok fitting that screws into the stainless bellows flange (TRN010280) Between the bellows flange and the back of the chuck Between the chuck and the ceramic isolator ring (TRN030003) Between the ceramic ring and the plenum adapter (TRN010399) 1/8" Teflon tube for Helium Bellows 5.
6. Low H2O flow error: if this error appears during a manual or automatic process, the flow switch in the tool is detecting low flow. This can either mean that the connected chiller is not sending enough coolant to the Trion (check the control panel on the chiller) or that there has been buildup blocking flow in the coolant lines. In the latter case, one solution is to clear the lines using CLR. First, dilute the CLR according to the label on the bottle. Next, there is a small pump somewhere in the cleanroom (probably in the back room with the photoresist fridge) that can be used to pump the CLR through the tool. This can be done for a few hours to remove the buildup.
7. Automatic process not working: If the processes are failing to run using the automatic process control (for example, the automatic process starts but then exits before running), the script file memory in the PLC controller may have been corrupted and needs to be rewritten. This is a fairly simple solution that can be performed through the Trion software. Essentially the procedure is to read and note the names of the script files in the “Hardware Setup -> Dilbert Status” software dialogue, then to use the “Hardware Setup -> Download Chamber Script” software dialogue to re-upload those same files to the controller. There are three files, one each to control the reactor, pumping, and gases, and it is usually best to replace all three. A more detailed procedure is available from the cleanroom manager, who has also included it in the manual for the tool.
8. RF tuning issues: There are a few issues that can lead to problems tuning the RF matching network.
a. Automatic tuning drifts out of calibration over time. A procedure is outlined in the Trion user manual showing how to re-tune the “phase-mag” component that performs the automatic tuning. It involves manually tuning the capacitor network, then minimizing a measured voltage from the phase-mag while adjusting a potentiometer. If automatic tuning has stopped successfully minimizing reflected power for most recipes, then it could be time to readjust the phase-mag in this way (see owner’s manual).
b. If the RF tuning seems to be not working at all, even in manual mode, and reflected powers remain high despite tuning, there are multiple possibilities of what has gone wrong. Recipes vary in how tunable they are. Some recipes (e.g. the Bosch etch recipes) are much harder to tune, so ensure that the problem isn’t just with your recipe. If the tuning issue is present across multiple recipes, then one of the RF capacitors for RIE tuning may have blown (again). Replacements are kept with the other component storage for the Trion tool.
9. Many other troubleshooting issues can be solved by referring to the tool manual. If there are any questions regarding the Trion RIE/ICP Etcher, please contact the student contact at the top of this page for more information.
Common Recipes
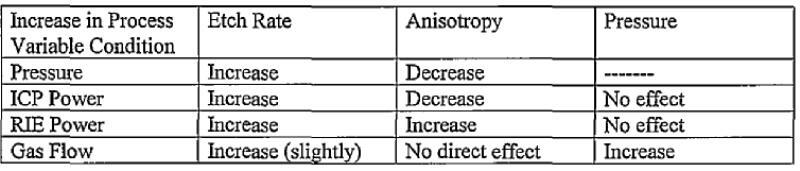
Use Helium backflow of 5-10 Torr on all recipes. Higher flow should improve wafer cooling and selectivity. Etch rates and selectivities will be slightly different when etching a small sample on a carrier wafer or a full wafer. Recipe Adjustment Characteristics
Silicon etch process - good uniformity
1. Deposition step RIE Power: 0 Watts ICP Power: 600 watts Pressure: 120 mTorr Gases: CHF3-75sccm Step Time: 32 seconds
2. Etch step RIE Power: 75 watts ICP Power: 600 watts Pressure: 35 mTorr Gases: CHF3-30sccm, SF6-10sccm, 02-2sccm Step Time: 30 seconds Etch Rate: 530A/min (etching time) Uniformity: ~3% variation Selectivity: ~3 Silicon etch process - good selectivity to PR or SU-8
1. Deposition step RIE Power: 0 Watts ICP Power: 600 watts Pressure: 120 mTorr Gases: CHF3-75sccm Step Time: 32 seconds
2. Etch step RIE Power: 75 watts ICP Power: 600 watts Pressure: 120 mTorr Gases: CHF3-30sccm, SF6-10sccm, 02-2sccm Step Time: 47 seconds Etch Rate: 330A/min (etching time) Uniformity: ~10% variation Selectivity: >10
Silicon etch process - Isotropic RIE Power: 200 watts ICP Power: 0 watts Pressure: 150 mTorr Gases: SF6-52sccm Etch Rate: 810 A/min Uniformity: ~30% variation Selectivity: ~9 (to SU-8 10) Silicon Dioxide (Si02) - Anisotropic, poor selectivity to PR or SU-8
RIE Power: 75 watts ICP Power: 600 watts Pressure: 12 mTorr Gases: CF4-50sccm Etch Rate: 3600A/min Uniformity: ~3% variation Selectivity: ~1.3 Silicon Dioxide (Si02) - Anisotropic, poor selectivity to PR or SU-8
RIE Power: 55 watts ICP Power: 350 watts Pressure: 20 mTorr Gases: CHF3-125sccm, 02-5sccm Etch Rate: 1250A/min Uniformity: ~3% variation Selectivity: ~1.5 Silicon Nitride (Si3N4)
RIE Power: 100 watts ICP Power: 0 watts Pressure: 250 mTorr Gases: SF6-45sccm, 02-5sccm Etch Rate: 2500A/min Polysilicon
RIE Power: 100 watts ICP Power: 0 watts Pressure: 300 mTorr Gases: SF6-50sccm Etch Rate: 5000A/min Polyimide or Photoresist
RIE Power: 100 watts ICP Power: 250 watts Pressure: 150 mTorr Gases: 02-45 sccm, SF6-5sccm Etch Rate: 10000A/min
(Note: If you do not want to etch into the passivation layer, the SF6 gas can be eliminated. In eliminating the SF6, the pressure needs to be lowered to 30 mtorr to ensure a clean etch.)
Aluminum
RIE Power: 75 watts ICP Power: 0 watts Pressure: 180 Mtorr Gases: BCl3-30 sccm, Cl2-30 sccm, CF4-2sccm Etch Rate: 1000A/min (Note: The CF4 is not necessary but ensures a smooth sidewall passivation on the aluminum. To increase the etch rate, increase the Cl2 flow. Be sure to rinse the wafer after processing because the residual chlorine will combine with moisture in the atmosphere to form small amounts of HCl.)